Storing files in our lives becomes crucial. When you possess an intriguing document, there's a risk of censorship or Google suspending your account. Despite this risk, sharing information for societal growth is a fundamental right.
Fear not, as I'll guide you through connecting your Google Account to IPFS using QuickNode. You don't need coding knowledge; I'll supply the necessary code!

What We Will Do
- Creating a script to activate every X minutes the backup
What You Will Need
Create an account on Google.
Create a Google Docs on Google.
Create an account on QuickNode.
What is QuickNode?
QuickNode makes it easier to start your first Web3 project by providing different services that save you time and money while also reducing the risk of security issues.
Obtaining information from QuickNode to deploy our script.
In the upcoming script, you'll need to include the "API_KEY" value.
It's crucial because it allows you to securely store files in a decentralized manner via QuickNode to IPFS.
Obtaining API_KEY value:
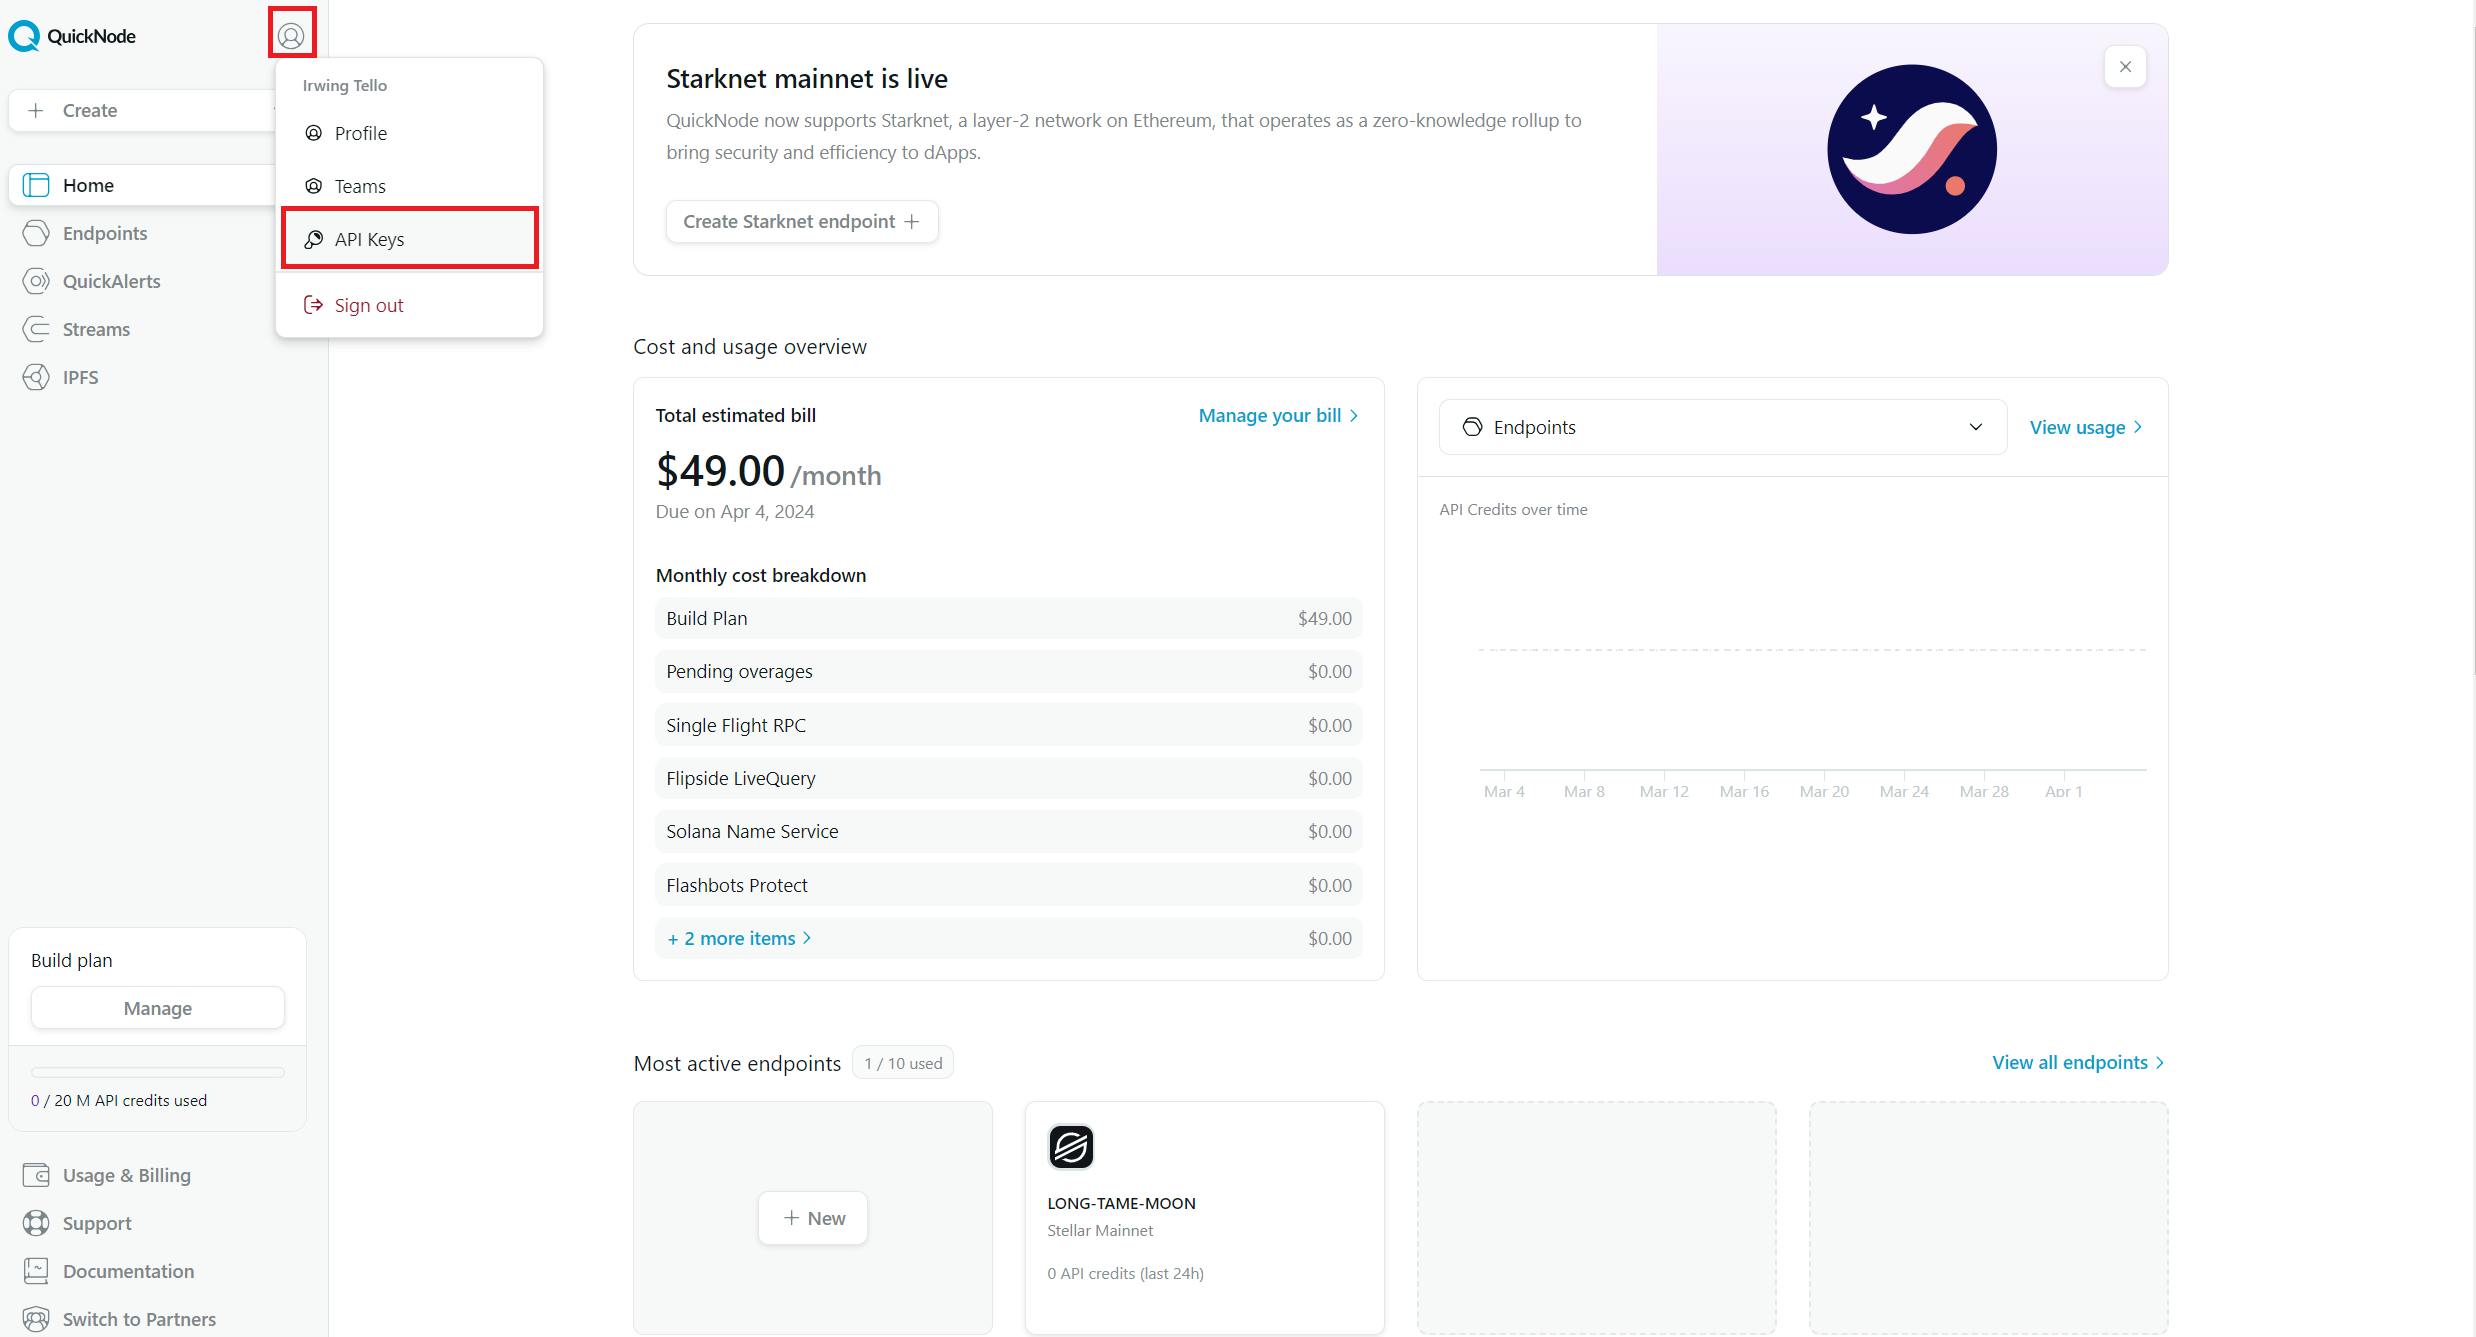
Click on the icon marked in red, then click on the "API Keys" section

After that, you will be shown this dashboard. Please click on the "Add API Key" button.

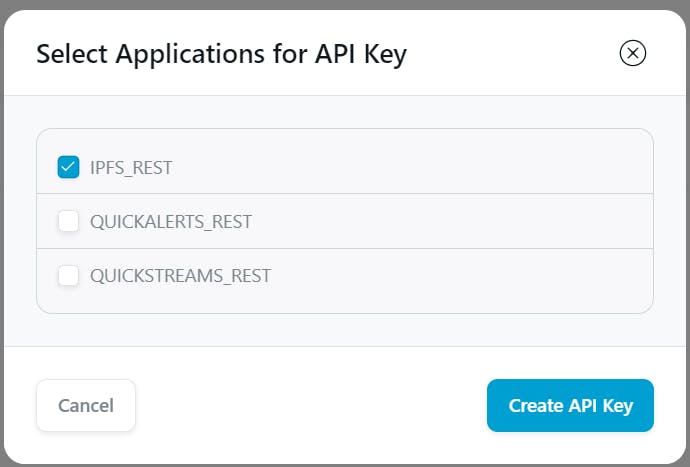
A pop-up will be displayed. Please select only the "IPFS_Rest" box, then click on the "Create API Key" button.

Now you have an API_KEY key. Please click on "Copy" and save this value for further steps.

Setting up automatic uploads to IPFS from Google Docs
I know you're excited to get your automatic updates. To accomplish this, please open your desired Google Doc.

Then go to "Extensions", please search for the "Apps Script" option.

Now you will see this screen , where we can put our magic touches!

In this section you need to copy this code and please rename the .gs file:
savingToIPFS.gs
function setupTrigger() {
  // This creates a trigger that runs the checkForChanges function every minute
  ScriptApp.newTrigger('checkForChanges')
    .timeBased()
    .everyMinutes(1)
    .create();
}

function checkForChanges() {
  var doc = DocumentApp.getActiveDocument();
  var body = doc.getBody().getText();
  var docProperties = PropertiesService.getDocumentProperties();
  var oldBody = docProperties.getProperty('docBody');

  // Check if the current body text is different from the stored one
  if (oldBody !== body) {
    uploadDocumentToIPFS(); // Upload updated document to IPFS
    docProperties.setProperty('docBody', body); // Update stored body text
  }
}

function uploadDocumentToIPFS() {
  var docId = DocumentApp.getActiveDocument().getId();
  var pdfBlob = DriveApp.getFileById(docId).getAs('application/pdf');

  // Create the payload as FormData
  var formData = {
    'Body': pdfBlob,
    'Key': 'document.pdf',
    'ContentType': 'application/pdf'
  };

  // Retrieve the API key from the script properties
  var scriptProperties = PropertiesService.getScriptProperties();
  var apiKey = scriptProperties.getProperty('API_KEY');

  // Setup the request options including headers and payload
  var options = {
    method: 'post',
    payload: formData,
    headers: {
      'x-api-key': apiKey,
    },
    muteHttpExceptions: true // Optional: to debug in case of HTTP errors
  };

  // Send the PDF to the IPFS via QuickNode API and log the response
  try {
    var response = UrlFetchApp.fetch('https://api.quicknode.com/ipfs/rest/v1/s3/put-object', options);
    var ipfsResponse = JSON.parse(response.getContentText());
    Logger.log(ipfsResponse);
  } catch (e) {
    Logger.log('Error: ' + e.toString());
  }
}

function manualTriggerSetup() {
  // Run this function manually from the Apps Script UI to setup the trigger
  setupTrigger();
}

function setApiKey() {
  // Run this function manually from the Apps Script UI to set the API key
  var scriptProperties = PropertiesService.getScriptProperties();
  scriptProperties.setProperty('API_KEY', 'QN_25462ca3f543550d2915c5e84df'); // Replace with your actual API key
}

Now, please go to the dropdown menu labeled "myFunction" and change the selected option to "setApiKey". Then, click on "Run". After that, change the dropdown selection to 'setupTrigger' and click "Run"again.

A pop-up will ask you to review what the code is doing. Don't worry, it's safe and there are no backdoors! :)

Then you will see the google permission that our script it's requiring.

Click on "Allow" and then you will see the message : "execution completed" .

Now let's go to write in our document!

To see our content, you need to go to https://dashboard.quicknode.com/storage/files:

In my case, I updated my document and now it's on the decentralized network!
Conclusion
In conclusion, securely storing and sharing important files is vital in our digital age, especially given the risks of censorship or account suspensions.
By connecting your Google Account to IPFS via QuickNode, you can ensure your documents are backed up in a decentralized and resilient manner.
This guide has walked you through the process of setting up an automatic backup script, highlighting the ease with which you can integrate these tools without needing extensive coding knowledge.
We ❤️ Feedback!
If you have any feedback or questions on this guide, let us know.
Or, feel free to reach out to us via Twitter or our Discord community server.
We’d love to hear from you!
Author: Irwing Tello
Discord: discord.com/invite/ADjtsHVreT
Twitter: twitter.com/irwingtello
LinkedIn: linkedin.com/in/irwingtello
Email: irwing@dfhcommunity.com
Youtube: youtube.com/@irwingtellomx
You can support my work here:
BTC: 34kXK9CpTJP1PyHKw2kUD2bt6rtGcG5CHY
EVM Address: 0x8B98F8Ff69d2A720120eD6C71A9Bc5072b8Eb46D
Solana: Ey9oVFHW79giacRZaKxigYjeihMsY7ox8jxc7Hp1sJmS
